#tutorial #guide #automation
How to use environments and variables to manage Local, Staging, and Production configs
· 6 min read
Managing Local, Staging, and Production API configs in one tool is painless when you use APIKumo's environments and {{variable}} substitution — here's a complete walkthrough.
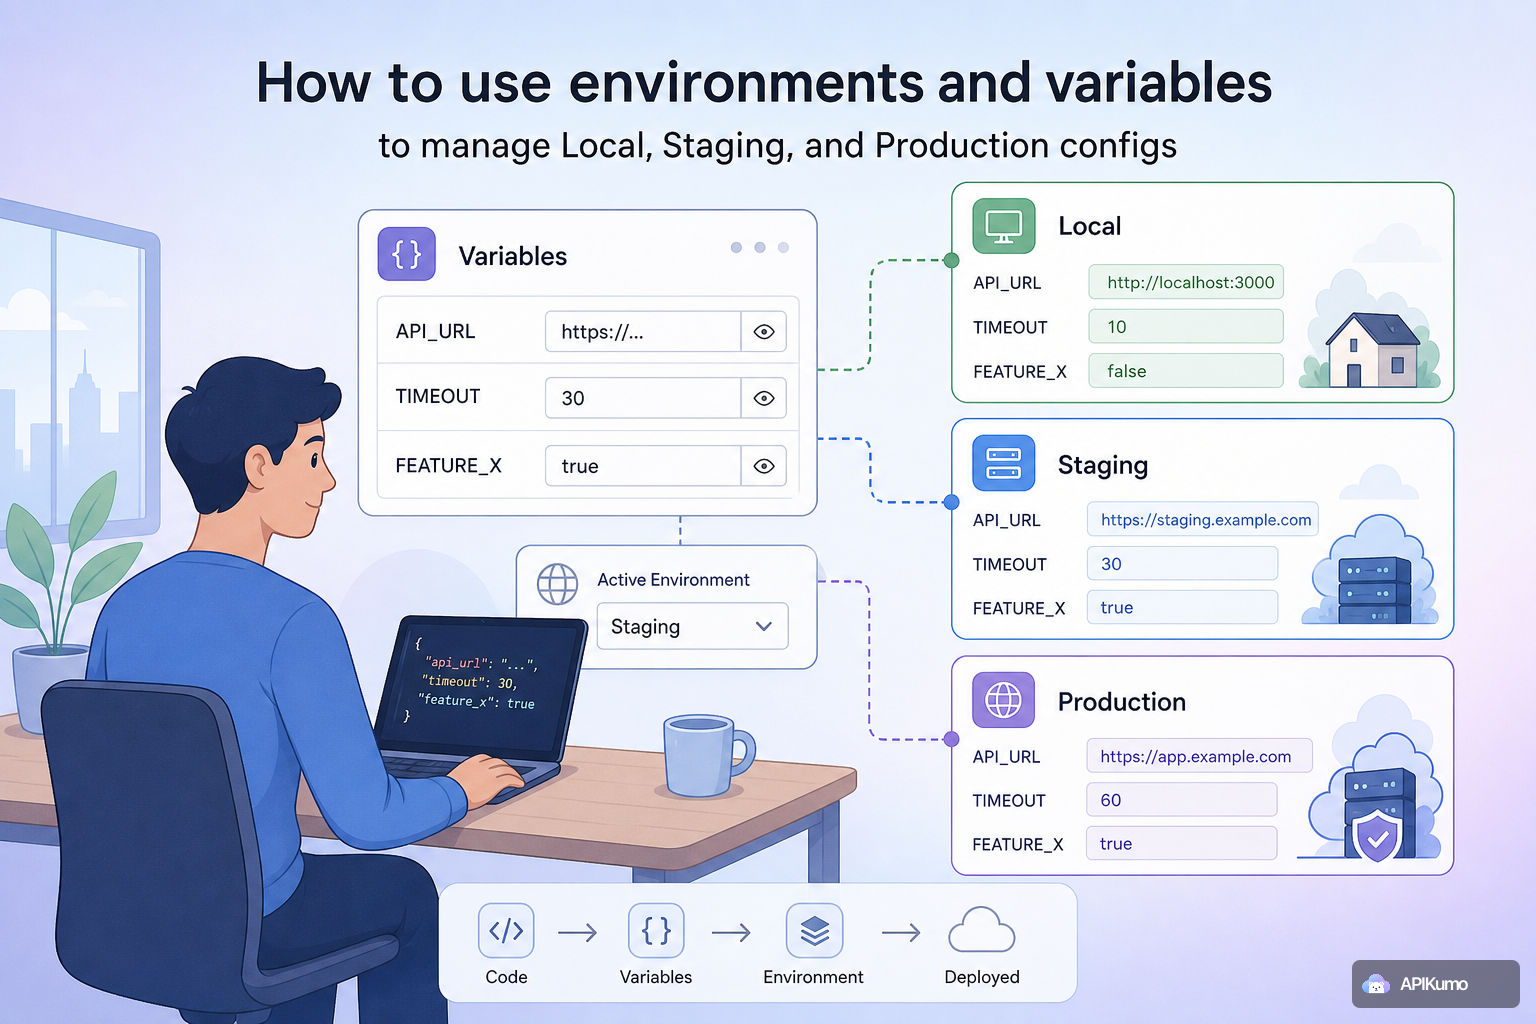
Every API project eventually splits into at least three worlds: your local machine, a staging server your team shares, and production. Keeping those configs straight — base URLs, API keys, tokens, timeouts — is tedious and error-prone when you paste values directly into requests. APIKumo's environments solve this cleanly. You define variables once per environment, reference them everywhere with syntax, and switch targets in a single click. Your saved requests never contain a raw secret. What environments actually are An environment in APIKumo is a named set of key-value pairs. Nothing more. The power comes from how those pairs are consumed: every URL, header, query parameter, and body field in a request is scanned for tokens at send-time, and the active environment's values are substituted in before the request leaves your browser. Because resolution happens at send-time — not at save-time — what gets persisted to your collection is the template , not the resolved value. Switch environments and you instantly get different behaviour from the same saved request. Creating your three environments Open the Environments panel from the left sidebar and create three environments: 1. Local 2. Staging 3. Production For each environment, add the variables your requests will need. A typical setup looks like this: | Variable | Local | Staging | Production | |---|---|---|---| | | | | | | | | | | | | | | | Keep variable names identical across environments. If exists in Local but not in Staging, any request referencing will send a literal string when Staging is active — a silent bug that's annoying to diagnose. Wiring variables into your requests With your environments in place, update your saved requests to use tokens instead of hard-coded values. URL Authorization header (using API-key auth mode) JSON body APIKumo resolves every token — in the URL, query params, all headers, and the entire request body — before the request is dispatched. The editor shows unresolved tokens with a subtle highlight so you can spot a missing variable before you hit Send . Switching environments in one click The active environment selector lives in the top-right corner of the workspace. Click it, choose Staging , and every open tab immediately reflects Staging values. There is no save step, no confirmation dialog — just an instant context switch. This is the real workflow benefit. You can: - Run a full collection against Local to iterate quickly. - Flip to Staging to validate the same requests against a shared server. - Switch to Production only when you mean it — and only you will, because saved requests never contain the production key. If a colleague opens the same collection, they see the same templates but use their own environment values, because environments are resolved client-side at send-time. Keeping secrets out of saved requests This point deserves its own section because it trips people up with other tools. When you save a request in APIKumo, the collection stores , not . Even if you export the collection as Postman v2.1, OpenAPI, or native JSON, the exported file contains only the variable name. The actual secret never leaves the environment store. A few practices that reinforce this: - Never create a variable named something generic like — vague names invite copy-paste shortcuts where someone just drops the real value straight into the URL. - Use distinct variable names per secret type — , , — so it is always obvious which credential a token is drawing from. - Use the bearer-from-env pre-processor for endpoints that need a fresh token at send-time (more on that in the next section). Chaining environments with pre-processors Environments shine brightest when combined with APIKumo's pre- and post-processors. A common pattern is chaining an auth request into downstream calls: 1. POST — sends and from the active environment. 2. A post-processor on that request extracts the field via JSONPath and writes it into a variable — say . 3. Every subsequent request uses . Because and are environment-scoped, the same three-step chain works against Local (using dev credentials) and Production (using live credentials) without any request edits. Flip the environment, run the chain, done. For APIs that require HMAC signing, the HMAC signing pre-processor draws the signing secret from — again, one variable name, three different values depending on the active environment. Using the Cmd/Ctrl+K palette to stay fast As your collection grows across environments, the Cmd+K (macOS) or Ctrl+K (Windows/Linux) command palette becomes your primary navigation tool. Type any part of a request name, folder name, or endpoint path and jump to it instantly — no hunting through nested folders. Combined with the environment switcher, a typical workflow looks like: 1. Press , type , open the request. 2. Confirm the environment selector shows Staging . 3. Hit Send . Three keystrokes and a mouse click. The context — base URL, credentials, environment-specific headers — is all handled. Syncing environments across devices APIKumo syncs your collections across every device you sign in from. Your environment definitions (the variable names and values you've entered) are part of that sync, so opening the workspace on a second machine gives you the same Local / Staging / Production setup immediately. Sign in with Google, GitHub, or Discord — no credit card needed while APIKumo is in preview — and your entire workspace, including environments, is waiting for you. A quick reference: environment setup checklist Before you send your first cross-environment request, run through this list: - [ ] Three environments created: Local, Staging, Production. - [ ] Every variable that appears in a request exists in all three environments. - [ ] No raw URLs, keys, or tokens appear in saved request fields — only tokens. - [ ] Auth requests have a post-processor that writes extracted tokens back to a variable. - [ ] The active environment selector is visibly set to the target you intend before hitting Send . Once this is in place, the only thing that changes between targets is the environment selector. Your requests, your processors, and your collection structure stay exactly the same. Wrapping up Environments and substitution are the foundation of a maintainable multi-target API workflow. Define values once, reference them everywhere, flip contexts in a click, and never worry about a production secret ending up in a committed collection export. If you have not wired up your Local, Staging, and Production environments in APIKumo yet, now is a good time — the setup takes about five minutes and pays back immediately.